
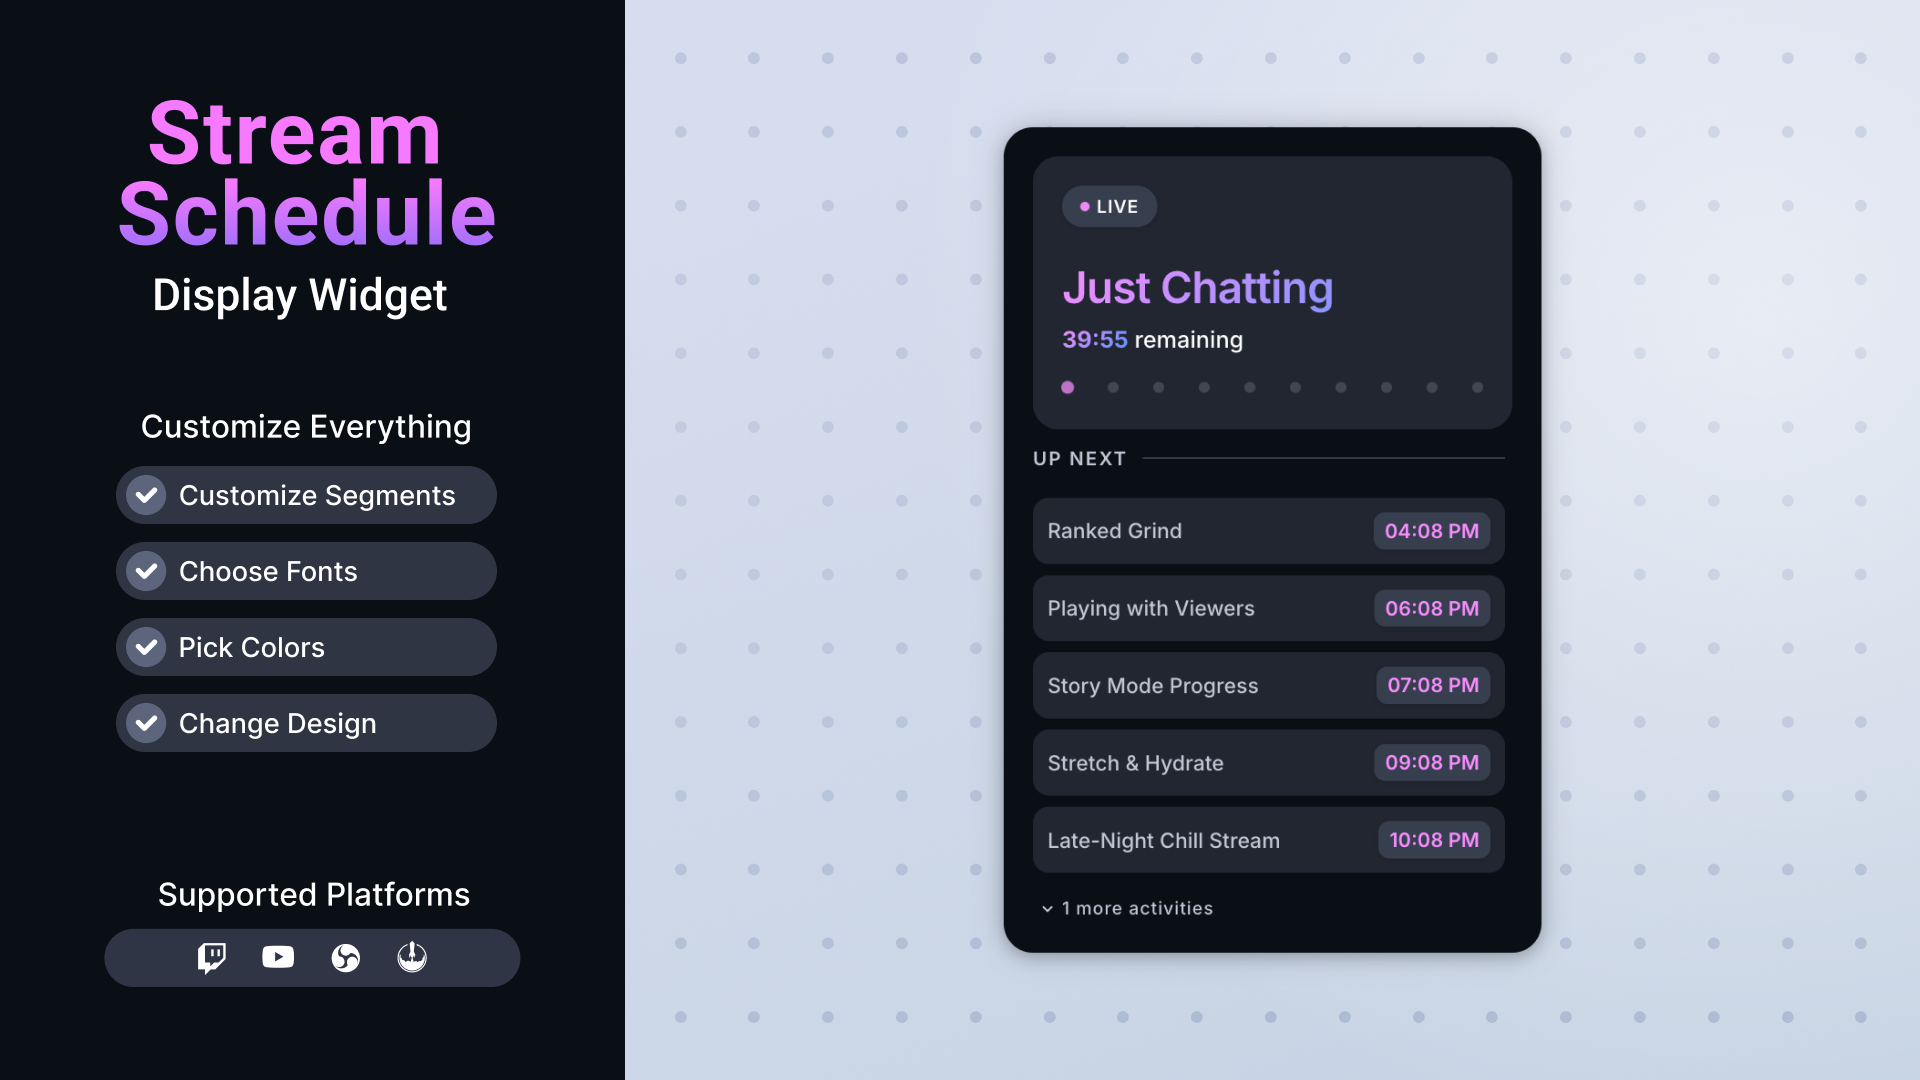
Stream Schedule
Thanks for downloading our widget!
Here you will find instructions on how to set everything up and an in-depth description of its possibilities.
⚠️ Take note: This widget is hosted on StreamElements and works only with StreamElements donations — make sure you have a StreamElements account before setting it up!
Widget Installation
- Log in to StreamElements with your Youtube or Twitch account
- Go to the “2. Widget” folder in the package you’ve downloaded
-
Pick the file that corresponds to your streaming platform (Twitch or YouTube) and double-click to install it.
Voila! Your widget is installed!
Widget Customization
-
Pick your widget in your StreamElements dashboard and click “Edit”
-
Click on “Layers” and go to your widget.

- Go to the “Settings” tab


- Woohoo, here you can customize everything to your taste :)
⚠️ IMPORTANT
For all of your customizations to take effect, you need to press "Save" in the top right corner of the editor and refresh the page before adding the widget to your streaming software!

Customization Fields
🎨 Color
| Name | Rewritten Description |
|---|---|
| Accent Color | Main accent color for highlights and key elements in the schedule. |
| Secondary Color | Secondary accent color used alongside the main accent color. |
| Widget Background | Background color of the entire schedule widget. |
| Card Background | Background color of each segment card. |
| Badge Background | Background color of the small badges (like duration labels). |
| Background Track Color | Background color for the progress track behind the indicator. |
| Border Color | Color of the border around the widget. |
| Divider Color | Color of the dividers between sections or segments. |
| Primary Text Color | Main text color used for titles and key information. |
| Secondary Text Color | Secondary text color used for supporting or smaller text. |
| Shadow Color | Color of the glow/shadow effect around the widget. |
🎛️ Design
| Name | Rewritten Description |
|---|---|
| Shadow Intensity | Strength of the glow/shadow effect around the widget. |
| Shadow Size | Size/spread of the glow/shadow effect. |
| Shadow Blur | Blur amount applied to the shadow/glow. |
| Border Weight | Thickness of the widget border. |
| Divider Weight | Thickness of the divider lines inside the widget. |
| Widget Width | Overall width of the schedule widget in pixels. |
| Progress Style | Style of the progress indicator (dots or bar). |
| Show Live Badge | Toggle showing or hiding the "Live" badge indicator. |
🗓️ Schedule
| Name | Rewritten Description |
|---|---|
| Number of Segments | Maximum number of schedule segments available. |
| Visible Upcoming Segments | Number of upcoming segments shown after the current one. |
| Segment 1 Title | Title/label for the first schedule segment (e.g., "Just Chatting"). |
| Segment 1 Duration (minutes) | Duration of the first segment in minutes. |
| Segment 2 Title | Title/label for the second schedule segment. |
| Segment 2 Duration (minutes) | Duration of the second segment in minutes. |
| Segment 3 Title | Title/label for the third schedule segment. |
| Segment 3 Duration (minutes) | Duration of the third segment in minutes. |
| Segment 4 Title | Title/label for the fourth schedule segment. |
| Segment 4 Duration (minutes) | Duration of the fourth segment in minutes. |
| Segment 5 Title | Title/label for the fifth schedule segment. |
| Segment 5 Duration (minutes) | Duration of the fifth segment in minutes. |
| Segment 6 Title | Title/label for the sixth schedule segment. |
| Segment 6 Duration (minutes) | Duration of the sixth segment in minutes. |
| Segment 7 Title | Title/label for the seventh schedule segment. |
| Segment 7 Duration (minutes) | Duration of the seventh segment in minutes. |
🔤 Typography
| Name | Rewritten Description |
|---|---|
| Font | Main font family used for the schedule text. |
| Title Font Weight | Thickness/weight of the title text (Regular, Medium, Semi Bold, Bold, Extra Bold). |
| Font Size | Base font size used for the schedule text. |
⌨️ Commands
| Name | Rewritten Description |
|---|---|
| Command Permissions | Who can use the schedule commands (broadcaster, moderators, VIPs, subscribers, or everyone). |
| Add Segment Command | Chat command used to add a new segment to the schedule (for example, !schedule add ). |
| Next Segment Command | Chat command used to move to the next segment (for example, !schedule next ). |
| Adjust Segment Command | Chat command used to adjust the current segment’s duration (for example, !schedule adjust ). |
| Clear Schedule Command | Chat command used to clear the entire schedule (for example, !schedule clear ). |
| Pause Timer Command | Chat command used to pause the schedule timer (for example, !schedule pause ). |
| Resume Timer Command | Chat command used to resume the schedule timer (for example, !schedule resume ). |
| Start Timer Command | Chat command used to start the schedule timer (for example, !schedule start ). |
| Adjust Following Segments | When enabled, adjusting one segment’s timing will also shift the timing of all following segments. |
⚙️ Behavior
| Name | Rewritten Description |
|---|---|
| Manual Start (requires !schedule start command) | When enabled, the schedule only starts when you run the start command instead of starting automatically. |
| Start Schedule Now | Button in the widget settings to instantly start the schedule. |
| Auto Progress Schedule | When enabled, the widget automatically moves to the next segment when the current one finishes. |
🌐 Translation
| Name | Rewritten Description |
|---|---|
| Remaining Label | Text used for the "remaining" label (for example, "remaining"). |
| Up Next Label | Text used for the "Up Next" heading. |
| More Activities Label | Text used for the label that describes additional upcoming activities. |
| Paused Overlay Text | Text shown on the overlay when the schedule is paused. |
| Start Button Text | Text displayed on the on-screen start button. |
⚠️ IMPORTANT
For all of your customizations to take effect, you need to press "Save" in the top right corner of the editor and refresh the page before adding the widget to your streaming software!
How to Add it to the Streaming Software?
OBS Studio
- Copy the URL of your Widget from the StreamElements dashboard
- Open OBS Studio
- Click “Add Source” (plus icon) in the Sources section.
- Add a “Browser” source, give it a name, and press “Ok”
- Paste the URL you’ve copied
- Set the width to 1920 and the height to 1080
- Press “Ok” and we’re done!
Streamlabs Desktop
- Copy the URL of your Widget from the StreamElements dashboard
- Open Streamlabs Desktop
- Click “Add a new Source” (plus icon) in the Sources section.
- Choose “Browser Source”, give it a name, and press “Add Source”.
- Paste the URL you’ve copied previously
- Set the width to 1920 and the height to 1080
- Now press “Close” and that’s it! Your widget is ready to use!